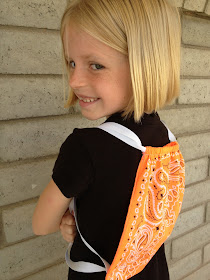
I really wanted to make something last night. So... I got crazy and pulled out my sewing machine. I had bought a bunch of bandana's and I remembered this post about a cinch bag. This idea came to me. A Mini Bandana Cinch Bag. You see... my girls are small. They are petite little things. I went to work on making this cute cinch bag. My first bag did not turn out "sew" well. I will be kind and show you the picture. Don't judge. I really am a beginner in the sewing department.
My lines were not even straight... I did not like the way the bandana was centered...The ribbon was too short...I even had to learn to sew a box to hold the ribbon onto the bandana. Oh well... I could go on and on... but I knew I was on the road to success.
Here is my second bandana...Success!
I love these mini bandana cinch bags. They are the perfect size for my little girls. They are what's the word, "light". They will not be able to hold a whole bunch of stuff, which is great. We plan on taking these to the beach and letting the girls put sea shells into them. They took me just over an hour to make. I think I will be making plenty more for the 4th of July, for birthday gifts, etc.
Here is what you need to make your own:
Mini Bandana Cinch Bag
By Carrie Perrins
*Inspired by Craft Goodies and Little Birdie Secrets
Supplies:
1 bandana- 22x22
4 yards ribbon- I used 5/8 inch white ribbon-cut in half
Rotary cutter or scissors or in my case a paper cutter
Sewing machine and matching thread
Iron
I followed this tutorial by Little Birdie Secrets almost exactly. You will want to check our her pillowcase backpack tutorial. They are adorable.
Step 1: Iron your bandana to get out all wrinkles.
Step 2: Fold your bandana in half.
Step 3: Cut bandana in half and trim off edges, to make bandana look even. Cut off only a tiny bit.
Step 4: Iron a 1/4 inch hem down each side of bandana.
Step 5: Sew a straight line down each side.
Step 6: Iron down a hem on top piece. Make sure it is wide enough to fit your ribbon. Sew down both top pieces.
Step 7: Turn bandana inside out so that the two outside pieces face each other. Sew down the sides of the bag, BUT make sure you start sewing under the ribbon hem. I started from the bottom so that I could stop at the ribbon hem.
Step 8: Turn your bag right side out, and pin safety pin to ribbon. Thread safety pin through ribbon hole starting on one side and finishing on the same side. The ribbon should make a complete circle. Repeat for other side. You should have two pieces of ribbon hanging down each side that should cinch the bandana. *You can measure the length of ribbon you would like and trim if necessary. I measured my girls and I only used 8 feet of ribbon.
Step 10: Admire your work and creativity. I know I did for a bit.
This is my daughter Bree modeling it for you. See... I told you my girls are small. This is a Mini Bandana Cinch Bag.
I really loved making these. They were easy, and fun!
My girls loved them! I only made the two last night... and so my other daughter is begging me to make hers. It will be "shocking" pink or in our terms neon pink. I am loving the neon colors right now? Are you?
Carrie
I am linking up here.


Aw, what a cute and brilliant idea! Also, just wanted to let you know that I have nominated you for an award! Congratulations! You can check it out here: http://carlasueeatsweet.wordpress.com/2013/06/01/sisterhood-of-the-world-bloggers-award/
ReplyDeleteThanks Carla! Love the sisterhood of the bloggers!
DeleteIt's my absolute pleasure, Carrie! :)
Delete